How to create a file in CSV format from Delphi / C++Builder / Lazarus application?
 CSV files (comma-separated values) are special types of files that you can create, read and edit in Excel. This format is textual and designed to provide tabular data. In CSV documents the data fields are separated by commas instead of columns (commas in English version or semicolons in Russian version of the program). Text and numbers saved in this format can be easily transferred from one software to another.
A CSV file can be read by a text editor, and the list of such editors includes most of the programs used to work with text and tables. Programs such as Microsoft Excel or Corel WordPerfect Office can open a CSV format, or this file can be opened by the utilities LibreOffice, Apache OpenOffice and many others.
When opening a document in Excel, the main task (issue) is to choose the encoding method used when saving the file. If the wrong encoding is selected, most likely the user will see a lot of unreadable characters. In addition, the separator is of key importance. For example, if you saved your document in English version and then you try to open it in Russian version, the quality of information displayed will suffer. It happens because of the separators.
The simplest and most obvious way to create a file in CSV format from Delphi application is just to iterate over cells in a StringGrid, write their contents to a file and remember to put a separator. And don’t forget about choosing the right encoding method.
Anyways, as usual FastReport can create CSV files from Lazarus and Delphi applications – better and more convenient. And not only from StringGrid object.
How to generate a report that will look good in the resulting table format?
There are few ways:
1. No intersections or cells overlapping! Yes, the FastReport designer allows you to drop objects on top of each other will partial overlap but table export tools take these requirements into account when transferring objects from the FastReport report to the resulting table file using special algorithms for tracing the objects intersections and their optimal location. At the intersections of the objects, new columns and rows will appear in the resulting table. This is necessary for maintaining the exact positioning of objects exported from FastReport.
2. Avoid cells overlapping using the text objects grid and guide alignment tools. Make sure that the grid alignment is turned on. You can increase the grid spacing to make the alignment easier.
3. When creating tables in reports, make sure that the neighboring cells borders are in contact with each other. It is important that the cells do not overlap. The export filter algorithm will cut the cells but the export result may be far from what you want (you will not see exactly what you wanted).
4. Arrange objects so that they are on the same line, both vertically and horizontally.
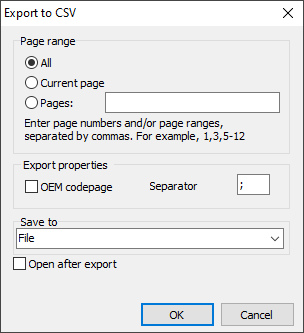
Before saving in .csv format you should already have a compiled project with “export to CSV file” component from FastReport palette. The report should be generated, too (we have a separate article on generating reports). Once again, yes, you can use internal sources of the application and databases as a data source for the report (and therefore for CSV). Any. Launch and save in the preview, just like in the textbook. Then call the export from the preview window (at the end of this article there is a way to do it using the code). The settings window should appear:

FastReport tools allow you to choose which pages of our document to send to Excel, certain pages or a range.
Export properties: whether to use OEM codepage (Windows encoding is set as default) and set the separator (the default is “;”), depending on what you need.
As usual, you can specify where to save your CSV file (in the local storage, send to E-mail, upload to FTP or cloud).
Open after export: the resulting file will be opened immediately after export.
Saving in .csv format using the code
| Saving in CSV | |
1 2 3 4 5 6 7 8 9 10 11 12 13 14 15 16 17 18 19 20 21 22 |
procedure TForm1.Button8Click(Sender: TObject); begin {Generate a report. The report must be generated before exporting} frxReport1.PrepareReport(); {Set the range of pages to export. By default, all pages of the generated report are exported} frxCSVExport1.PageNumbers := '2-3'; {Set whether to export the text in OEM or Windows encoding} frxCSVExport1.OEMCodepage := False; {Set the Separator} frxCSVExport1.Separator := ';'; {Set whether to open the resulting file after export} frxCSVExport1.OpenAfterExport := False; {Set whether to display export progress (show which page is currently being exported)} frxCSVExport1.ShowProgress := False; {Set whether to display the export filter settings dialog box} frxCSVExport1.ShowDialog := False; {Set the name of the resulting file. Please note that if you do not set the file name and disable the export filter dialog box, the file name selection dialog will still be displayed} frxCSVExport1.FileName := 'C:\Output\test.csv'; {Export the report} frxReport1.Export(frxCSVExport1); end; |
As you can see, it’s even easier than exporting to CSV from the grid! Use it!