How to create a sales receipt from a WPF application
I guess every WinForms developer came across the idea that the standard form controls look too unitary and that it would be nice to bring more interesting design to the application. So, especially for such cases when we need a special design, Microsoft created a special library – WPF (Windows Presentation Foundation).
If you are creating a sales accounting software, you need to generate primary accounting documents, such as invoices and receipts. These documents should reflect data from the database. The best solution would be to use a report generator to create a document template and populate it with data. You can use the report generator libraries to integrate reports into a WPF application. Thus, for any event, you can generate and display a report, as well as export it and sent it to print.
You need to create a template in the report designer before outputting the report. In this article we will use the FastReport.Net report generator.
In the sales receipt information about the seller, buyer and sold goods will be displayed. Some countries tend to separately indicate the tax rate and calculate the tax due as well as the final amount after taxes.
Therefore, in our example we will consider such a sales receipt.
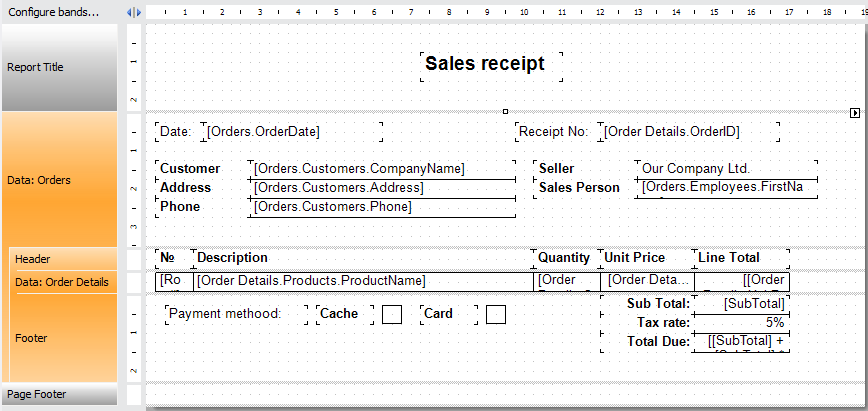
Since the data will be taken from the database, first we need to create a connection to the data source. In this example, we will use the nwind.xml demo database from the FastReport.Net distribution. We will need these tables: Orders, Order Details, Customer, Employee. Our task is to create the following template:
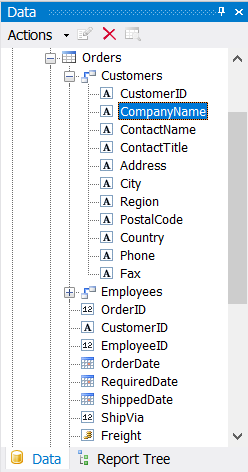
To display data from each table for a specific order, all of them must be connected. To do so, FastReport.Net provides a mechanism for linking tables by keys. The Orders table is linked to Customers and Employees tables, the Order Details table is linked to Orders and Products.
This means that for a specific order record, the corresponding data will be selected from these tables by key. Thus we can get the name of the buyer from the Customers table for the specific Orders record:
The Data band has a detailed band with its header and footer bands. For the detailed Data band, the Order Details source is defined. This table also has links:
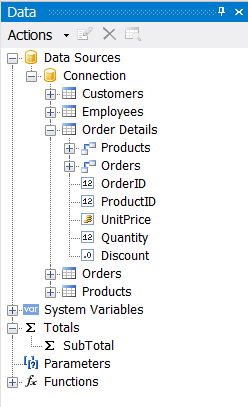
As you probably expected, it is linked to the Orders table, as well as to the Product table from which you can get the product names.
Now, when it’s clear that the main information is taken from the Orders table and the detailed product information comes from the Order Details table, we can consider the totals.
The first is Line Total – the multiplication of the goods quantity by the price is calculated by simply multiplying the fields: [Order Details.UnitPrice] * [Order Details.Quantity]]. This total is calculated for each item.
Next you need to summarize all the totals in this column and display them in Sub Total field. To do this, create a new Total in the Data window:
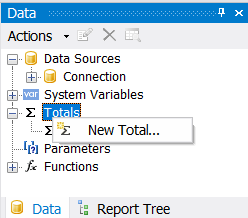
Let’s give it SubTotal name and set the properties in the appeared window:
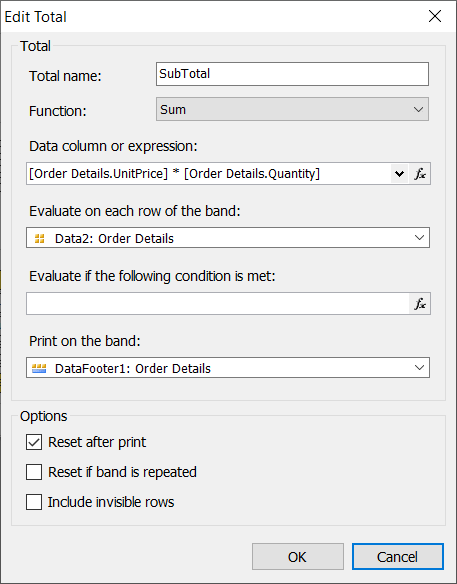
As you can see, we used the Sum function to total. For the data expression we used a combination of multiplying the same fields as in Line Total. Thus we get the sum of all totals for all products.
The Tax Rate field indicates the percentage of the tax base that must be paid in taxes. In our case this number is 5%.
For the Tax Due field, you need to calculate the amount due for tax. The formula is simple: total * interest rate:
[[SubTotal] * 0.05]
And, finally, the Total Due. It consists of the sum of subtotal and tax:
[[SubTotal] + [SubTotal] * 0.05]
This completes the creation of the sales receipt. You need to save the report template in your application. For example, create App_Data folder and save your report template and data base nwind.xml in it.
Now let's move on to the application.
In the application
To display the report in the application, we need to add the ScrollViewer component to the form to be able to scroll the report. Add another component – ListBox – inside. It will be used to display the report in Xaml format. Add three buttons to the application form: display the report, export report to PDF, print the report.
Add a click event for each of the buttons. So, the report display:
1 2 3 4 5 6 7 8 9 10 11 12 13 14 15 16 17 18 19 20 21 |
private void Button_Click(object sender, RoutedEventArgs e) { var report = new Report(); report.Load("C:/Users/User/source/repos/WPFInvoice/WPFInvoice/App_Data/invoice.frx"); var data = new DataSet(); data.ReadXml("C:/Users/User/source/repos/WPFInvoice/WPFInvoice/App_Data/nwind.xml"); report.RegisterData(data); report.Prepare(); var export = new XAMLExport(); export.HasMultipleFiles = true; using (var ms = new MemoryStream()) { export.Export(report, ms); lb.Items.Add(new Frame() { Content = XamlReader.Load(ms) }); } } |
Here we create a report object, load the report template we created earlier into it. Next, create a data source and register it in the report. Forms in WPF applications are built using the XMAL language. Therefore, the report must be displayed in this format. To do this, we performed the export to XMAL.
The code for the button to export the report to PDF format:
1 2 3 4 5 6 7 8 9 10 11 12 13 14 15 16 |
private void PDFExport_Click(object sender, RoutedEventArgs e) { var report = new Report(); report.Load("C:/Users/User/source/repos/WPFInvoice/WPFInvoice/App_Data/invoice.frx"); var data = new DataSet(); data.ReadXml("C:/Users/User/source/repos/WPFInvoice/WPFInvoice/App_Data/nwind.xml"); report.RegisterData(data); report.Prepare(); var export = new PDFExport(); export.HasMultipleFiles = true; using (var fs = new FileStream("C:/Users/User/source/repos/WPFInvoice/WPFInvoice/App_Data/report.pdf", FileMode.Create)) { export.Export(report, fs); } } |
The idea here is the same as with the display of the report, but we save the result obtained from the export in a folder and don’t add it to the form.
The code for the button to print the report:
1 2 3 4 5 6 7 8 |
private void Print_Click(object sender, RoutedEventArgs e) { PrintDialog printDialog = new PrintDialog(); if (printDialog.ShowDialog() == true) { printDialog.PrintVisual(lb, "Print the report"); } } |
Before printing the report, you need to display it first using the button. By clicking on it, you will call the print dialog and print the contents of the ListBox component.
Now run the application and click the Show button:
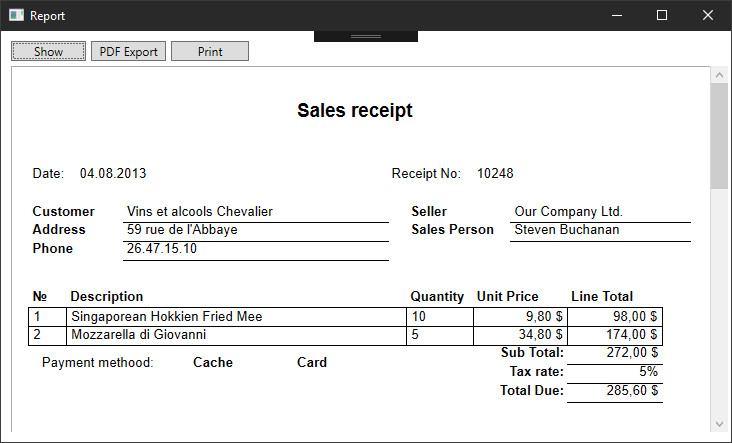
Now you can not only view the receipt created, but also save it in PDF format and print it! You can export it to other file formats available in FastReport: HTML, BMP, PNG, JPEG, GIF, TIFF, EMF, PDF, XLSX, DOCX, PPTX, ODS, ODT, RTF, Text, XPS, XML, XAML, PS, PPML, LaTeX, Json, Dbf, Csv, XLS (Biff8), SVG, ZPL.