How to custom toolbar for web FastReport .NET report
Many users of report generators are interested in setting up the toolbar when reviewing the report. Such questions appear periodically on forums and questionnaires. Like this user of the DevExpress report generator who wants to customize the web report toolbar ASP.Net MVC.
In some cases, the user will simply be satisfied with hiding unnecessary controls. But what if the standard report review toolbar doesn't satisfy at all?
A standard web report toolbar may not suit the user by design or toolkit. The only solution to these problems may be to implement your own toolbar. Of course, it does not have to be a panel, controls can be placed as you like on the web page. We're just going to "pull the report for the right ropes" to get the behaviour we need. As an example, we'll look at the standard ASP.Net MVC app.
Web method returns a representation of the report and by custom controls. We use a static object of the web report, in order to be able to manipulate them throughout the application. For example, turning the pages.
1 |
public static WebReport webReport = new WebReport();
|
The web method takes several parameters: export type, display toolbar, panel style, type of transition to another page.
1 2 3 4 5 6 7 8 9 10 11 12 13 14 15 16 17 18 19 20 21 22 23 24 25 26 27 28 29 30 31 32 33 34 35 36 37 38 39 40 41 42 43 44 |
public ActionResult Index(string ExportType,string toolbar, string page) { SetReport();//Method of the loading template into the report object if (ExportType != null) Export(ExportType); //Report export method SetPage(page); //Go to the particular report page method ShowToolbar(toolbar); //Hide/display toolbar method webReport.Width = Unit.Percentage(100); webReport.Height = Unit.Percentage(100); ViewBag.WebReport = webReport; return View(); } //Upload the report object method private void SetReport() { string report_path = GetReportPath(); System.Data.DataSet dataSet = new System.Data.DataSet(); dataSet.ReadXml(report_path + "nwind.xml"); webReport.Report.RegisterData(dataSet, "NorthWind"); webReport.Report.Load(report_path + "Master-Detail.frx"); } // Go to the particular report page method public void SetPage(string page) { switch (page) { case "Next": NextPage(); break; case "Prev": PrevPage(); break; case "First": FirstPage(); break; case "Last": LastPage(); break; case "Print": Print(); break; } } |
This method essentially selects the action depending on which button we click on the web page. In addition to the actions of navigating the report, there is a button to print the report.
1 2 3 4 5 |
//Next page public void NextPage() { webReport.NextPage(); } |
These and other report navigation methods use the standard function buttons on the report toolbar.
1 2 3 4 5 6 7 8 9 10 11 12 13 14 15 16 17 18 19 20 |
//Previous page public void PrevPage() { webReport.PrevPage(); } //First page public void FirstPage() { webReport.FirstPage(); } //Last page public void LastPage() { webReport.LastPage(); } //Print report public void Print() { webReport.PrintHtml(); } |
The report print can also be set as PrintPDF(). At the same time, the report will be pre-exported to the pdf format.
1 2 3 4 5 6 7 8 9 10 11 12 13 14 15 16 |
//Report export nethod public void Export(string type) { switch (type) { case "pdf": webReport.ExportPdf(); break; case "csv": webReport.ExportCsv(); break; case "doc": webReport.ExportWord2007(); break; } } |
In order to determine the export format, we again used a switch statement. Depending on the selected format is performed corresponding to the export method.
1 2 3 4 5 6 7 8 9 10 11 |
//Set the path of the report folder private string GetReportPath() { return this.Server.MapPath("~/App_Data/"); } //Hide/display the toolbar default method public void ShowToolbar(string toolbar) { webReport.ShowToolbar = toolbar; } |
Now let's take a look at the program. As you know, our task is to create a print, export and navigation report control.
1 2 3 4 5 6 7 8 9 10 11 12 13 14 15 16 17 18 19 20 21 22 23 24 25 26 27 28 29 30 31 32 33 34 35 36 37 38 |
@{ ViewBag.Title = "Home Page"; } <div style="float:left"> <div align="left"> @using (Html.BeginForm("Index", "Home")) { <table> <tr> <td> <input id="Print" type="submit" value="Print" onclick="document.getElementById('page').value='Print'" /> </td> <td> @Html.DropDownList("ExportType", new List<SelectListItem>() { new SelectListItem(){ Text= "PDF", Value = "pdf"}, new SelectListItem(){ Text= "CSV", Value = "csv"}, new SelectListItem(){ Text= "Word", Value = "doc"}, }, "Select export type", { @onchange = "this.form.submit()" } ) </td> <td> @Html.CheckBox("Show toolbar", true, new { @onchange = "this.form.submit()" }) Toolbar </td> <td> <input id="first" type="submit" value="<<" onclick="document.getElementById('page').value='First'" /> <input id="prev" type="submit" value="<" onclick="document.getElementById('page').value='Prev'" /> <input id="next" type="submit" value=">" onclick="document.getElementById('page').value='Next'" /> <input id="Last" type="submit" value=">>" onclick="document.getElementById('page').value='Last'" /> <input id="page" type="hidden" name="page"> </td> </tr> </table> } </div> </div> <div> @ViewBag.WebReport.GetHtml() </div> |
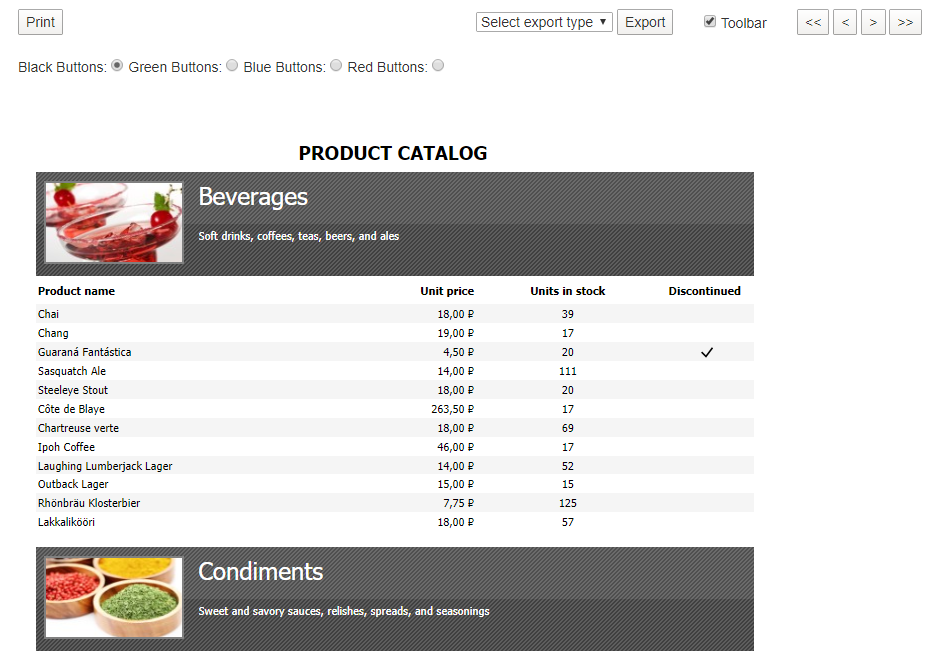
We have added a Print button, a drop-out list with export types, a checkbox hiding a standard toolbar, and a page-by-page transition button (first, previous, next, and last page). Let's see what happened:

As a result, we created our own toolbar to interact with the report. That will allow us to embed these elements into the design of the web page and abandon the standard panel. In this example, we didn't implement all the functionality of a standard toolbar, but only basic features. You can easily implement other features by analogy with the example considered.