Setup of advanced export functions in FastReport.Web for Core and Blazor Server
Often, our users need to change the file export parameters, and we will look at their implementation today. This feature was integrated into the 2022.1 release. Let's say that we have a finished project. Let's take any report from the FastReport .NET demo application and add additional parameters to the export window using this code:
WebReport.Toolbar.Exports.EnableSettings = true;
Now let's run our application and see the result:
Let's study how it works in FastReport Web for Core in more detail.
All options for advanced export settings have been implemented to be enabled or disabled depending on just one setting, EnableExportSettings. You can set up customized export options. Let's say we only need PDF and HTML. The implementation will look like this:
Exports = new ExportMenuSettings()
{
 ExportTypes = Exports.Pdf | Exports.HTML
}
Let's slightly change the export settings in the container, you can read more about this in the article Toolbar customization and export settings in FastReport.Web for Core.
Let's enable advanced settings using the EnableSettings property, this will allow calling modal windows with various additional settings for export:
WebReport.Toolbar.Exports.EnableSettings = true;
Let's run our application and see the result:
In the screenshot above, we have only two formats for saving. You can also notice the possibility to localize into various languages. To use different languages, you need to write a small line of code:
webReport.LocalizationFile = Path.Combine(Directory.GetCurrentDirectory(),"Localization", "English.frl");
But how to export a file with advanced settings? Let's look at this step by step.
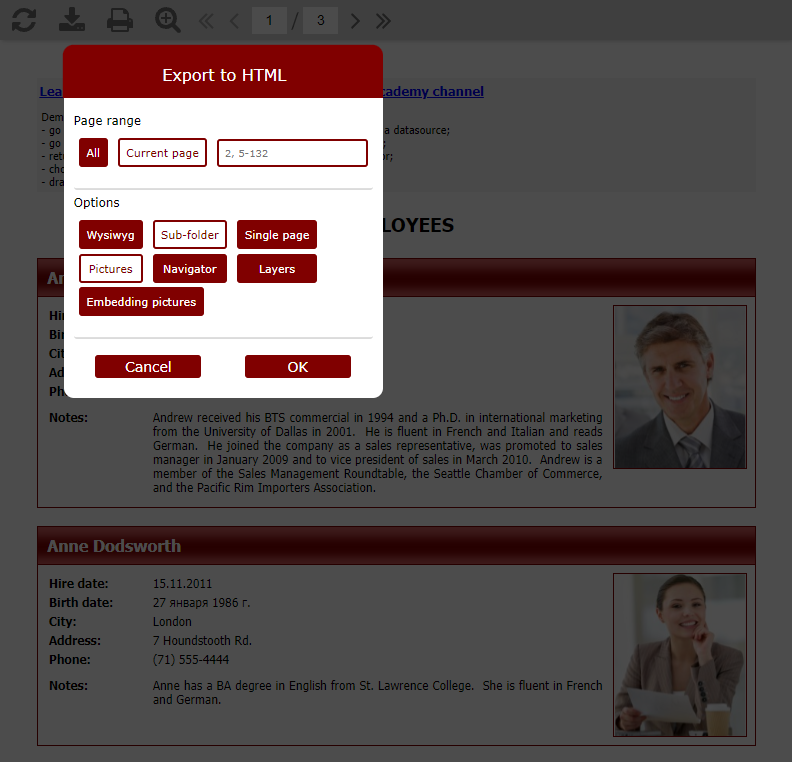
Step 1. Click on the gear opposite “Export to PDF”, where the following window should appear:
Step 2. Select the parameters that we need, for example, an HTML file without images:
Step 3. Click OK and look at the result:
If the pictures are not displayed, then we did everything right.
It should be noted that you can customize the settings window. Let's take a look at how to do this. First, let's write a few lines of code:
WebReport.Toolbar.Exports.Color = Color.Gray;
WebReport.Toolbar.Exports.FontSettings = new Font("Times New Roman", 14, FontStyle.Bold);
Let's see what happened:
You may notice that the color is set to gray and the font family is Times New Roman as specified.
At this stage, we examined how to use the advanced export settings for FastReport.Web for Core.
Now let's show you how to work in Blazor. Again, we will review one of the available reports. For example, let's take the demo application from our article Toolbar customization and export settings and add new features to it. Let's again add advanced settings and all kinds of exports. By the way, there is also customization here and it is used in the same way as in Core. Go to Pages/Index.razor.cs file and write two lines of code:
webReport.Toolbar.Exports= ExportMenuSettings.All;
webReport.Toolbar.Exports.EnableSettings = true;
Let's run our application:
We see that all the exports are displayed and their advanced settings too. Let's try it with the advanced export options to “HTML”. To do this, open the settings by clicking the left mouse button on the gear, where, for example, we will leave only the current page with pictures:
We confirm our choice with the "OK" button and look at the result:
We covered how to use the advanced export settings for FastReport.Web for Core and Blazor Server through your application code.


